Rocket League: Ultimate Freeplay Trainer Plugin
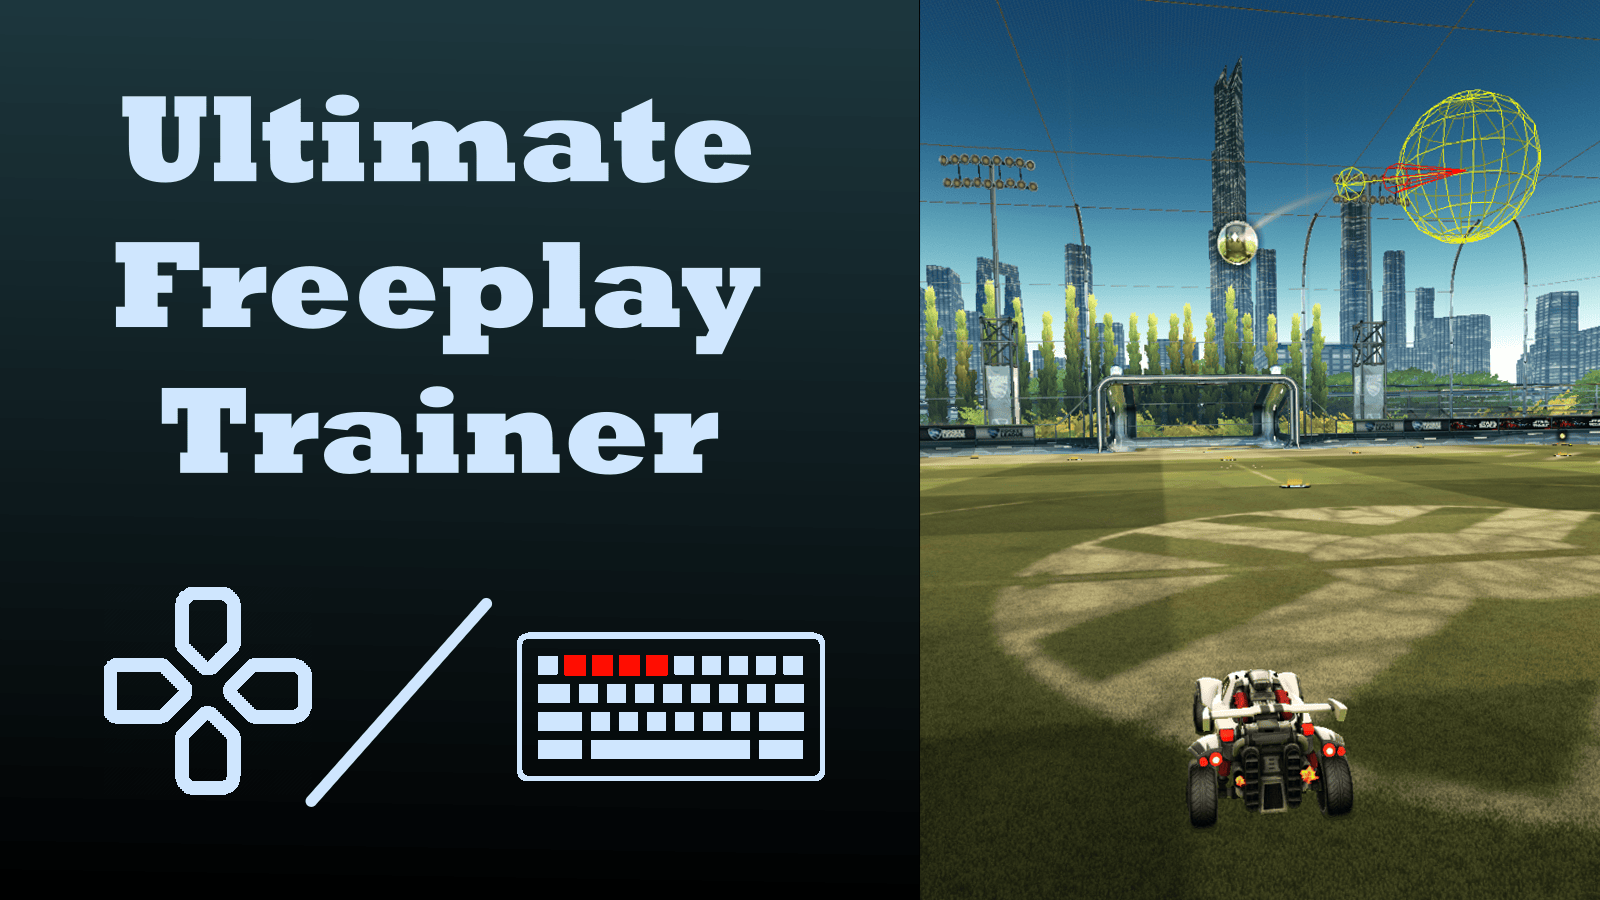
What is this Project?
One video game I've loved to play for a while is Rocket League. One feature of Rocket League is the ability to go into freeplay and command the ball around with your D-Pad. One thing I noticed was a severe lack of customization. These commands were preset, and all you could change was essentially how random they were. This bothered me as there were shots I never used, some that would occasionally mess up and clip into the car, causing the ball to fling across the field. This began to bother me more and more, until I decided to do something about it.
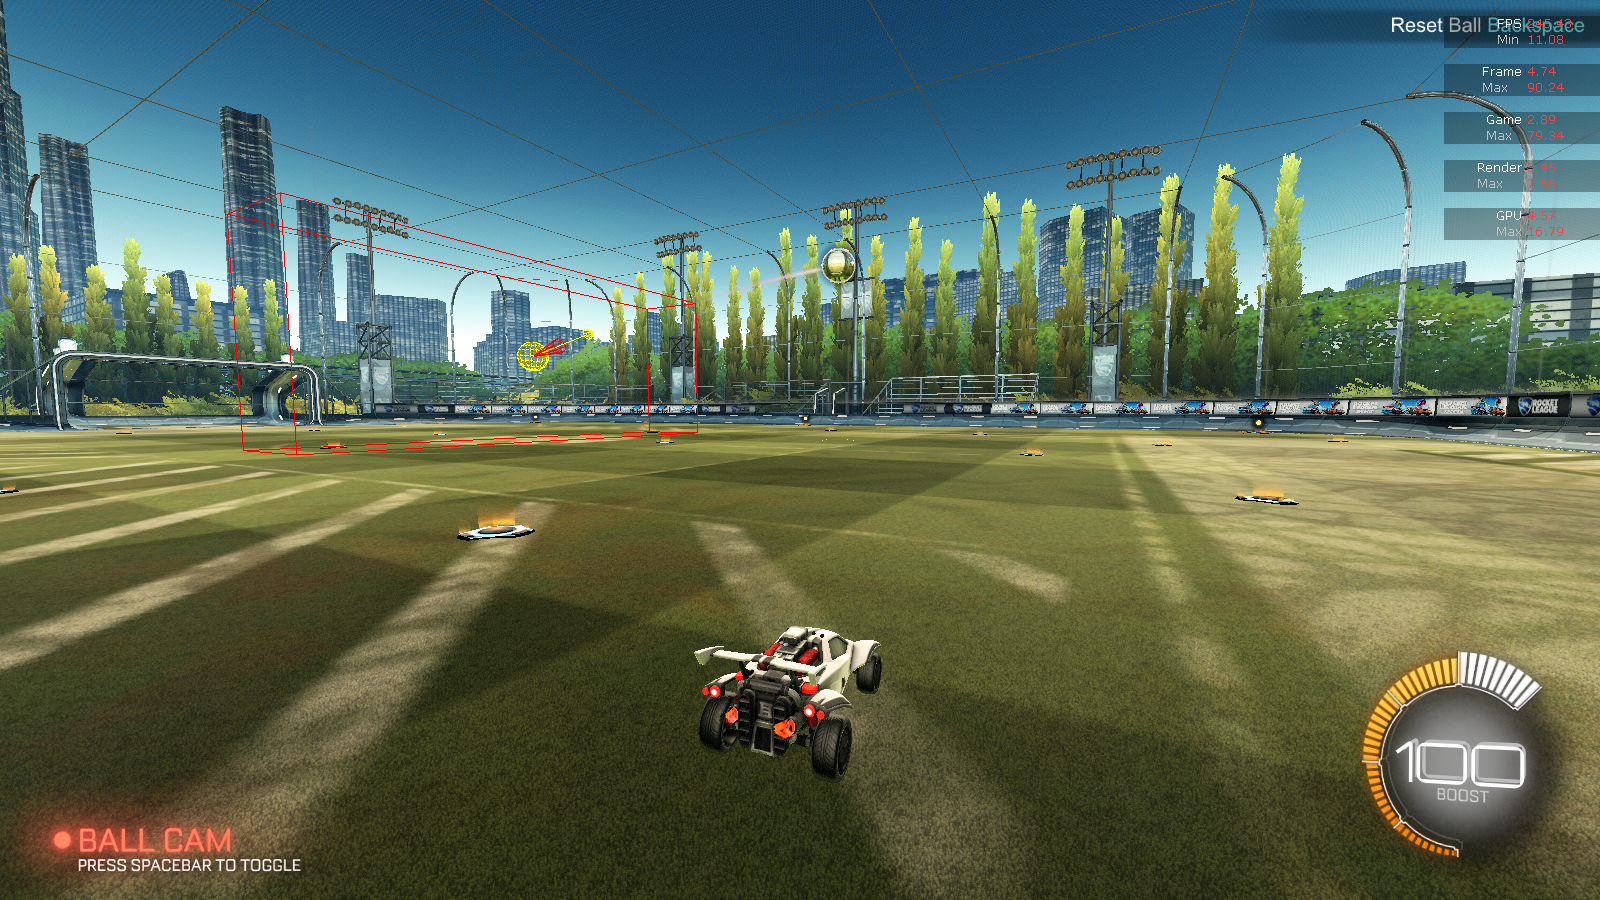
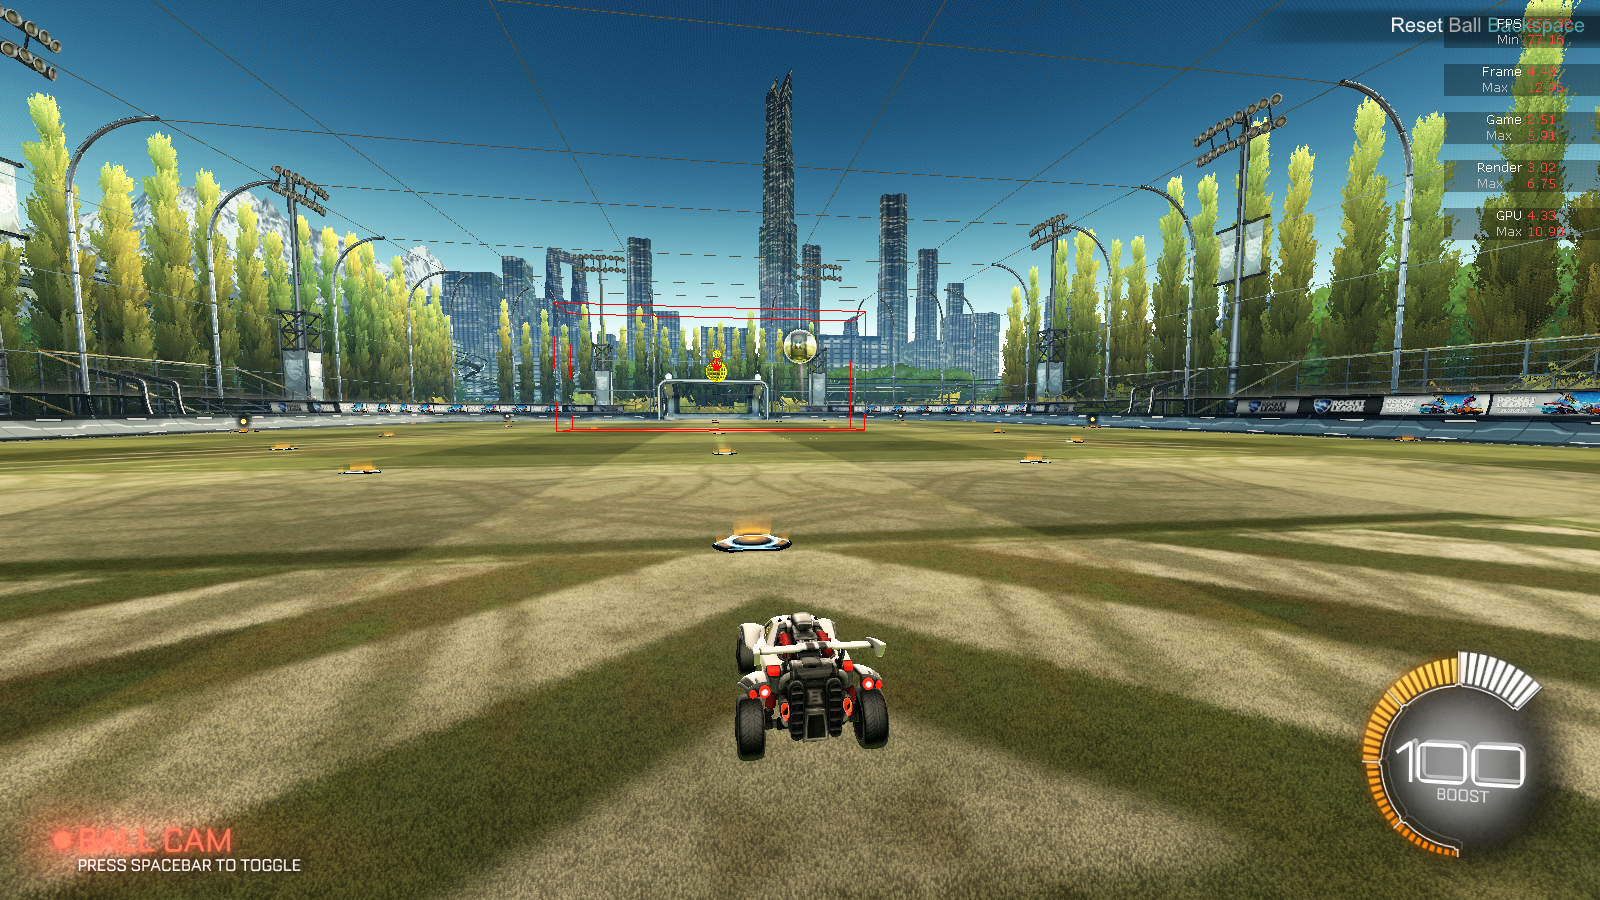
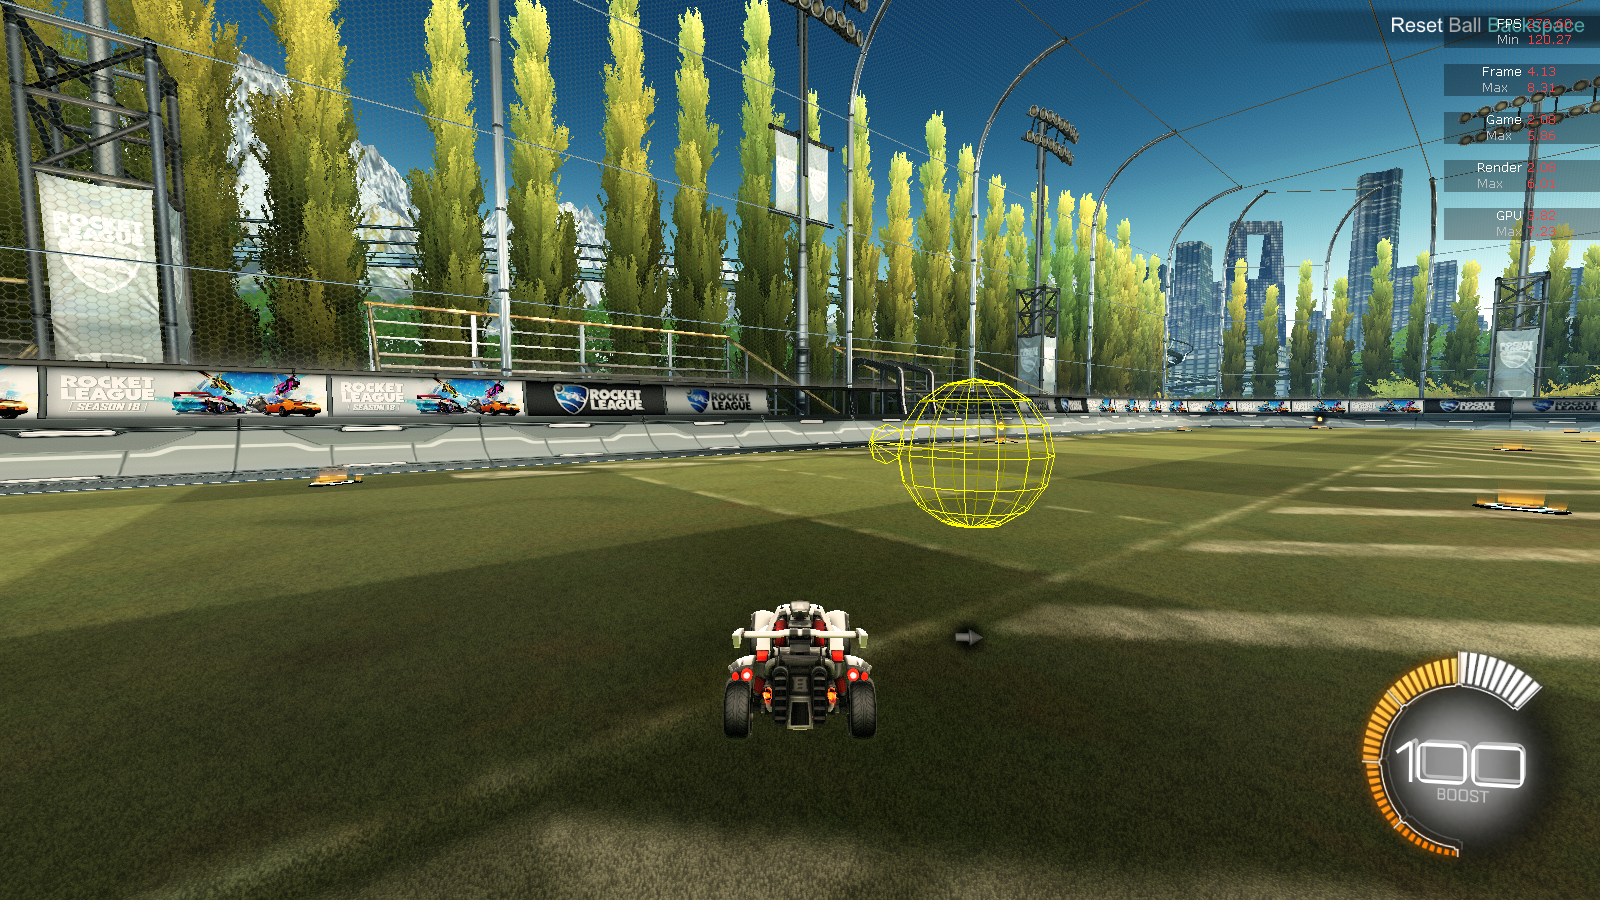
I created the Ultimate Freeplay Trainer plugin to solve these issues. With this plugin, you can define the initial position/velocity, variance, and mirroring. You can even have it calculate the trajectories to the goal live, allowing for training of passes or shots on net. I even added a projected 2D UI (appears 3D) so that you can see exactly where on the field the ball will spawn, in addition to the direction and variance.
Not only can you customize the shots, but I also created 16 unique shot presets that you can customize. In addition, I developed 4 unique keybind presets that allow you to select which shot is bound to which key. You can also switch between the 4 presets as needed. This means every bound shot is one you like to use.
How does it work?
This project was written entirely in C++ and utilizes Bakkesmod to integrate my plugin into the game. Additionally, I use ImGui to create the GUI for customization and nlomhann's JSON loader to load and store presets. The project has a simple overlaying architecture: first, the program loads the JSON file and stores its information. This allows us to display and make changes in the customization menu in ImGui. Once the user saves their changes, it stores these lists back into JSON. When a button is pressed, this triggers the button event caller and ensures it is a D-Pad or 1234 button. Whichever button is pressed will then map to the shot presets position in the loaded lists based on the chosen keybind preset. This ensures that whichever keybind preset is chosen, the D-Pad/1234 buttons will correctly map to their currently chosen shots. Once the preset position is identified, we run the offset calculations. This determines if the shot is relative to the car (parent-child relationship), goal, or center, and makes adjustments accordingly. After determining where the ball spawns, we check if it needs to be mirrored. After this, we calculate the ball's trajectory to its desired target, if selected by the user. Targets include: goal, backboard, car (current position), and in front of the car (future position). Once all calculations are done, the shot can be performed..
Additionally, this project required extensive UX design. The plugin is complex on the user end, with many options to adjust and flags to select. The UI was designed to appear simple and understandable at first glance. Two methods were used for this: implementing collapsible menus in the GUI and using toggleable 3D indicators to show how the shot will be performed on the field. Collapsible menus ensure that users initially see only overarching categories, providing perspective on customization options. When they expand a menu, they see all options under it. Indicators were built using a base 3D UI library for Bakkesmod called RenderingTools. While this library provided a good base, I customized it further with color options, out-of-bounds identification, and frustum calculations for better accuracy. Out-of-bounds identification works with color customization: my algorithm inverts the shape portion that extends beyond bounds, helping users know when the ball might spawn out of bounds. Frustum calculations were straightforward to add, as most code was already provided in the library. However, some shapes like cones required adjustments since they were originally intended for different use cases, avoiding artifacts when indicators extend off-screen.
Future Plans?
- Crash Testing: The plugin is currently live, and I'm gathering public feedback to identify areas for improvement.
Live Venue Management System
What is this Project?
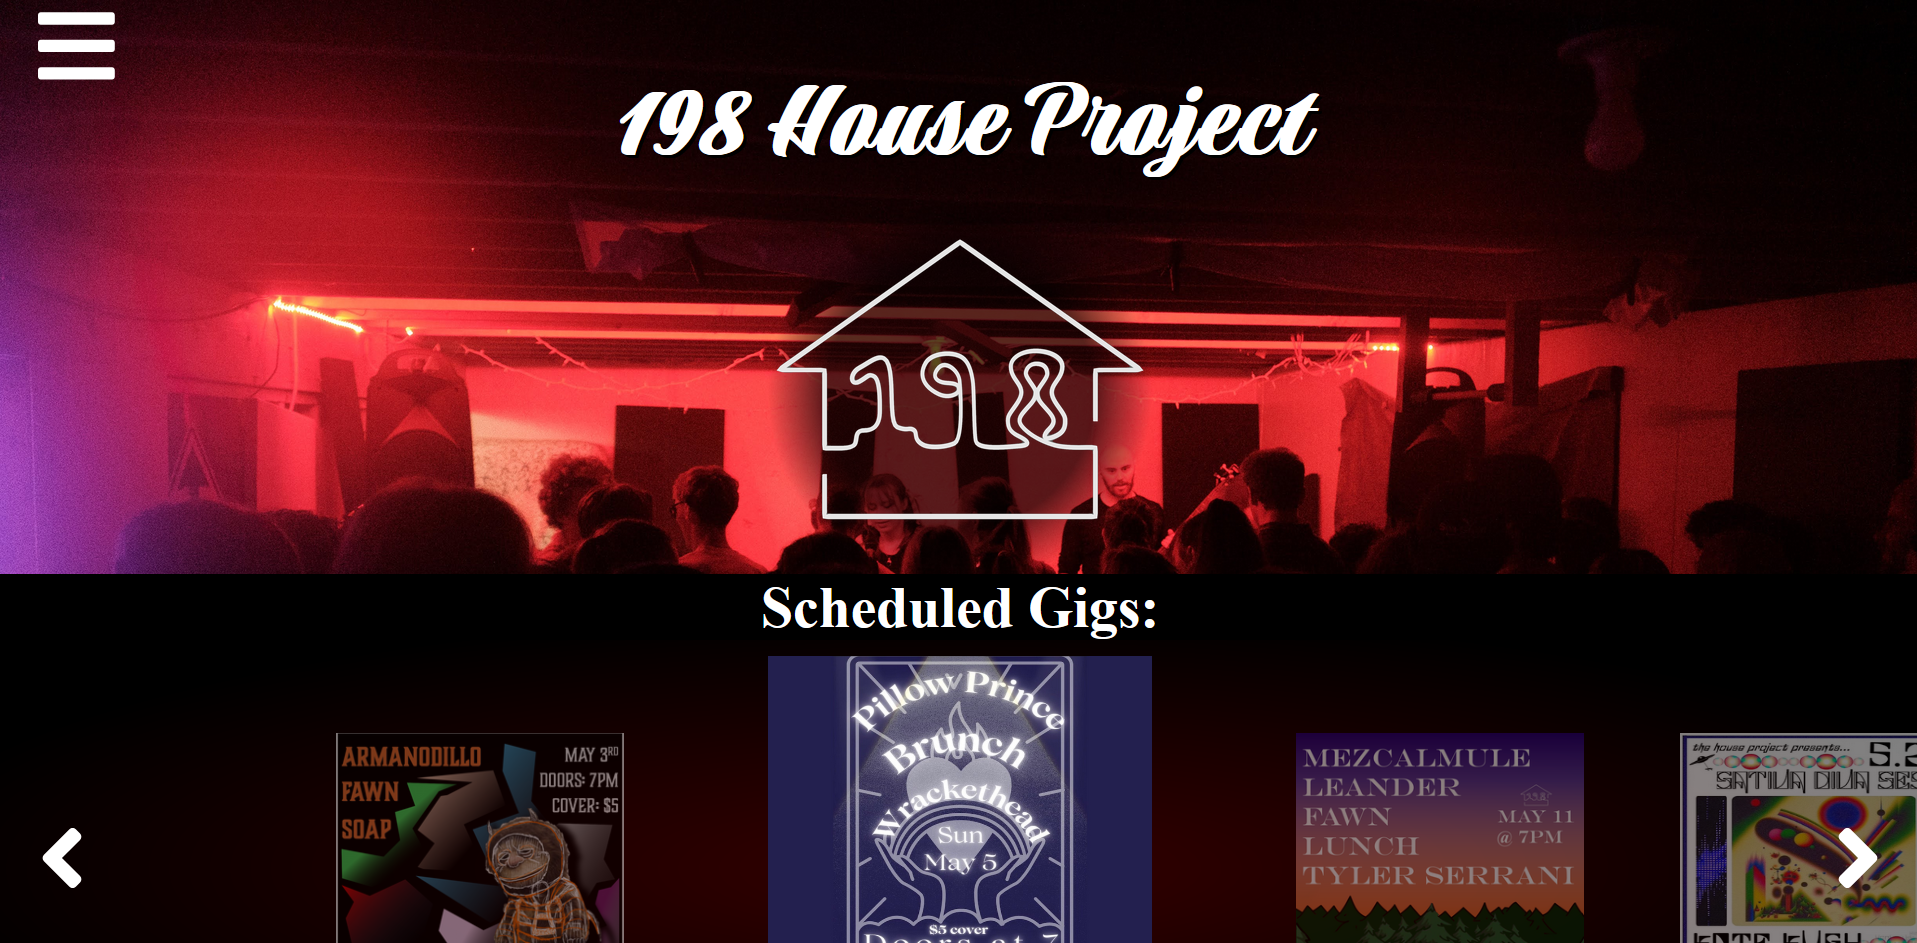
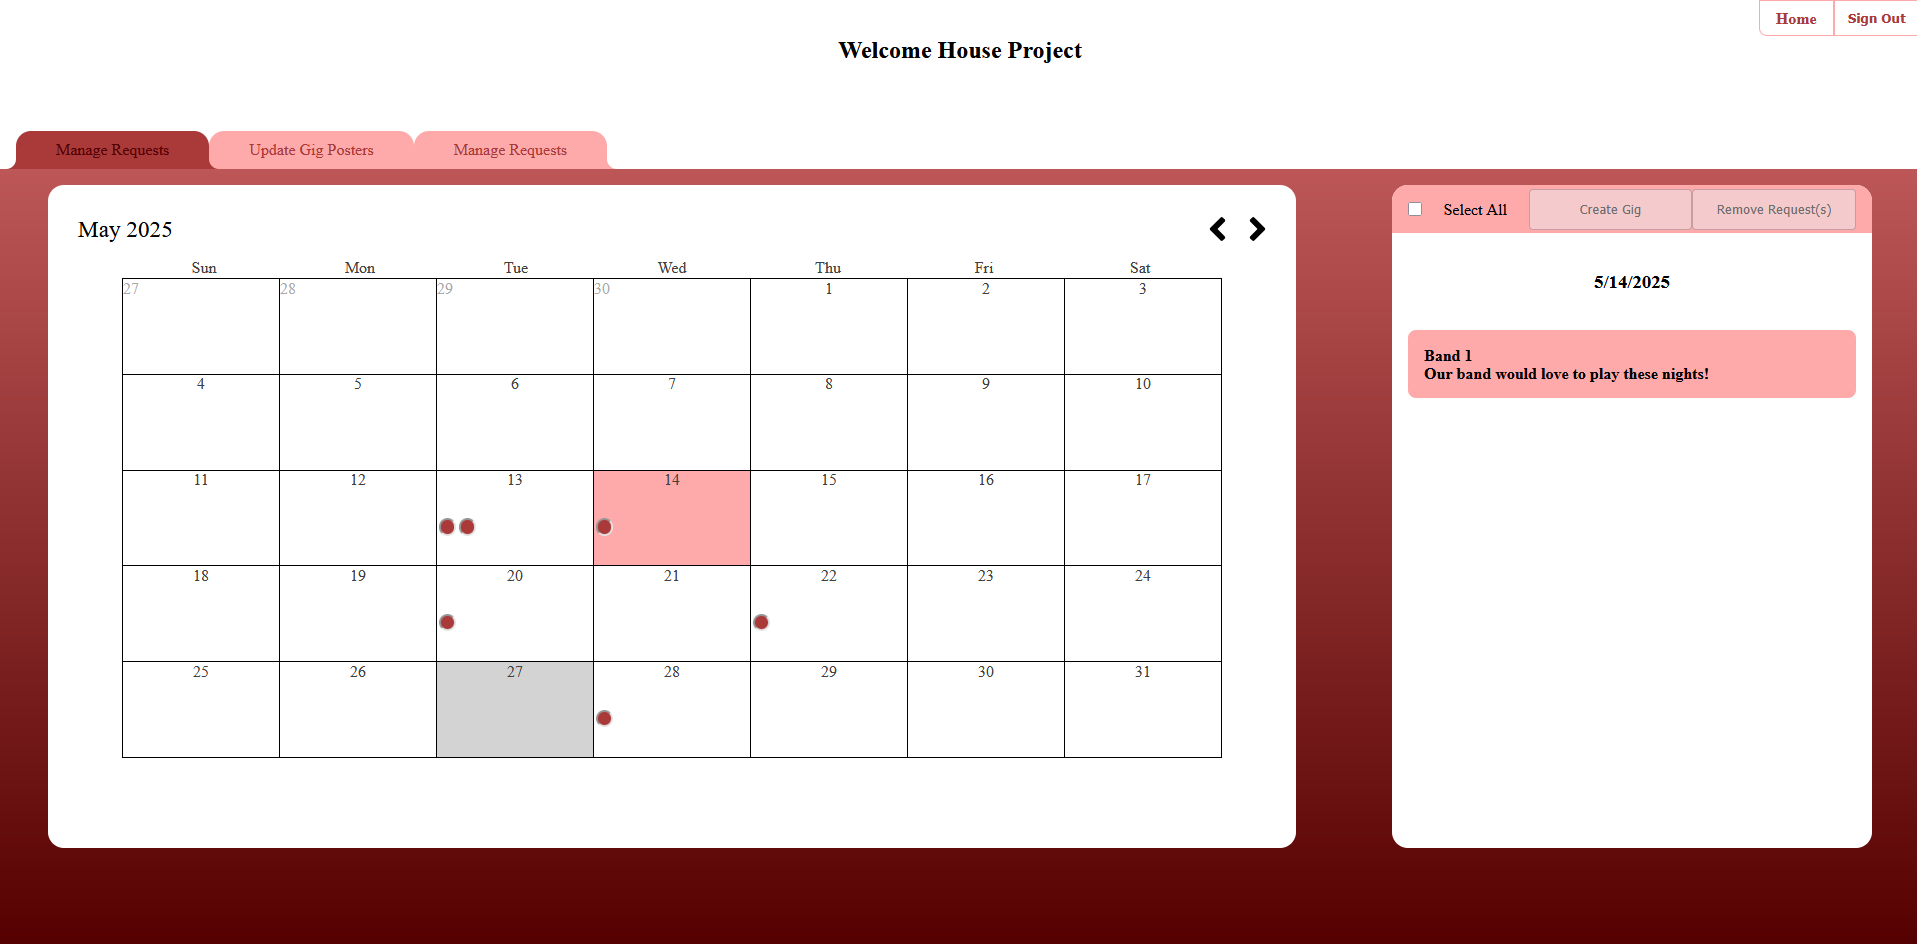
This project is a live music venue management system designed to streamline the gig management process. Bands can create accounts and use the client GUI to select dates they want to play. These requests are stored in a MySQL database. Venues can then log into the admin page to group requests into gigs, organizing requested nights seamlessly compared to previous methods using Instagram DMs.
How does it work?
Written entirely in HTML, CSS, JS, PHP, and SQL, this software enables secure login access with PHP encryption. Each venue account has a flag in the database so that logging in shows the admin page, giving venue managers control over all incoming requests. Bands can only create requests.
Future Plans?
- Google Calendar Integration: Automatically add gigs to the venue's Google Calendar when created.
- Profile Customization: Allow bands to add profile pictures and more details about their music style.
- Automatic Grouping: Group similar bands together based on their type to create cohesive gigs easily.
- Band Request Calendar: Display requested nights and scheduled gigs to help bands plan their requests effectively.
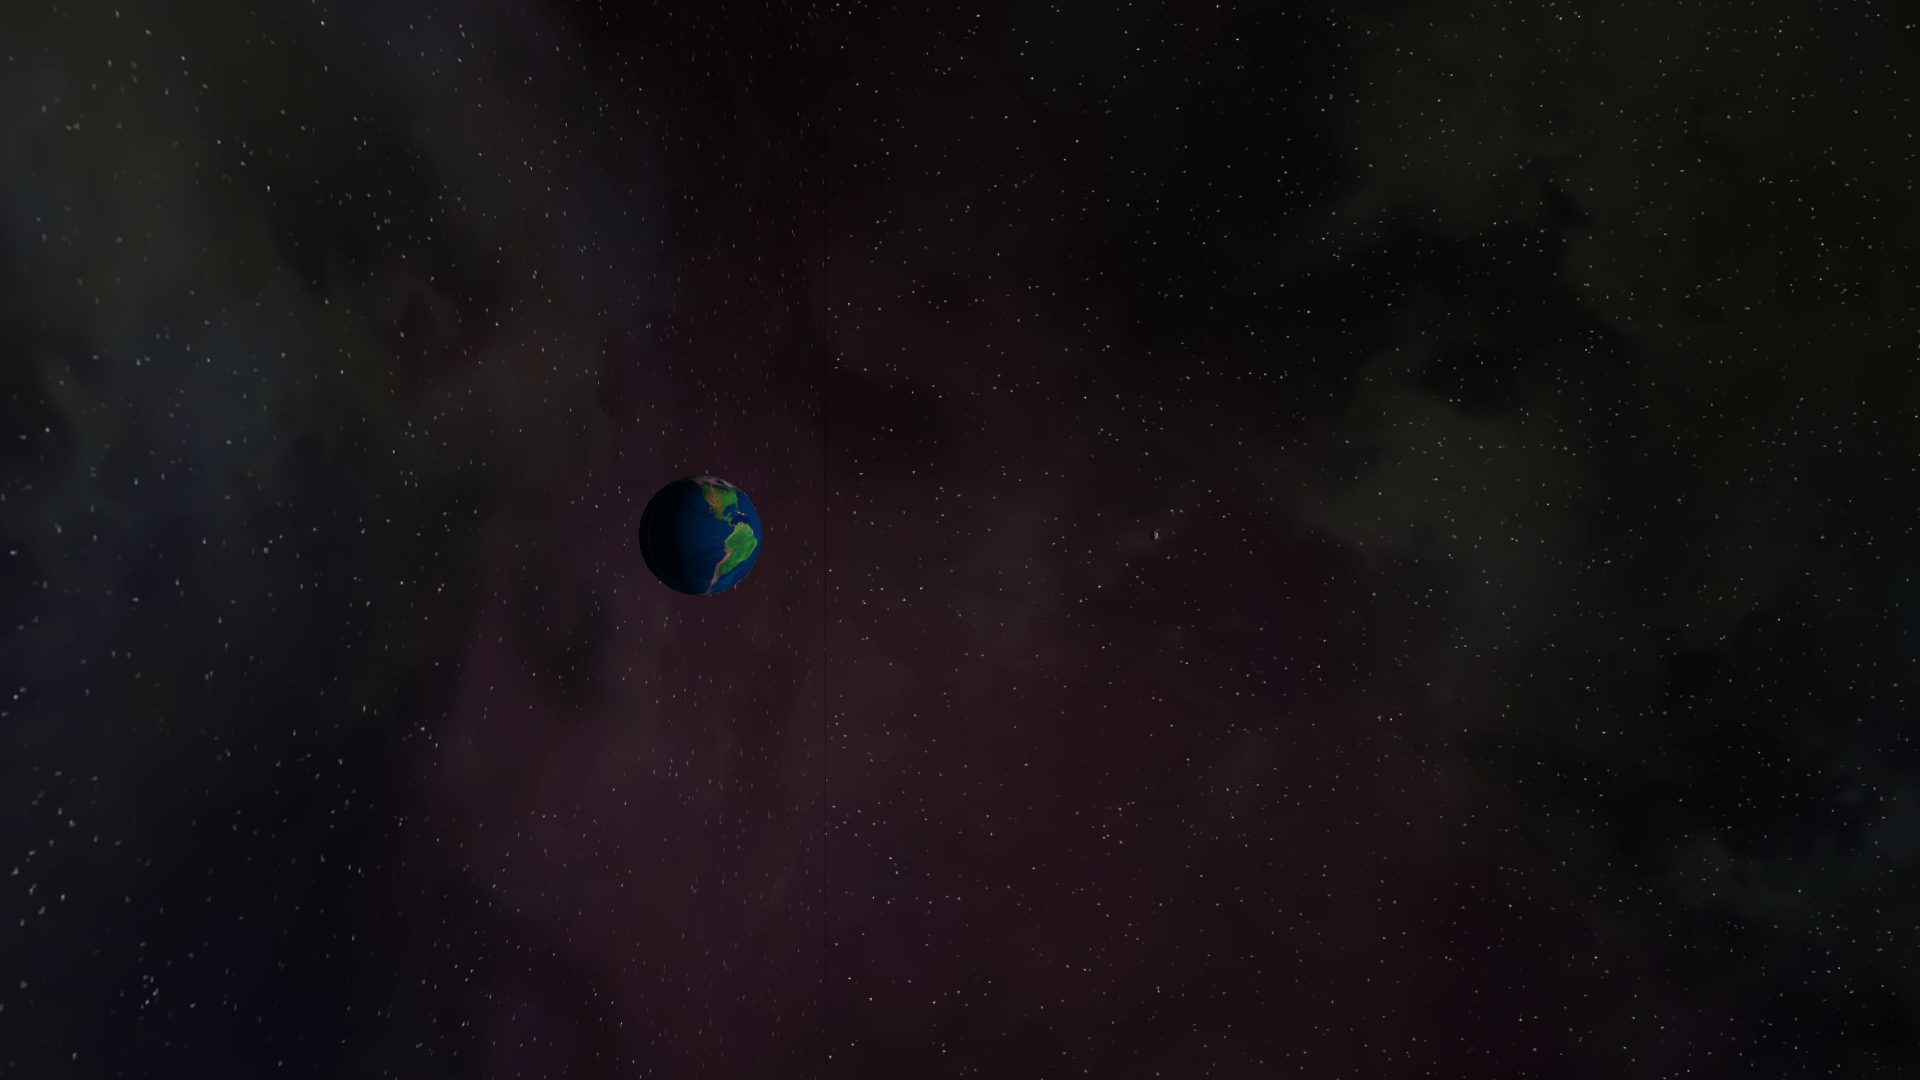
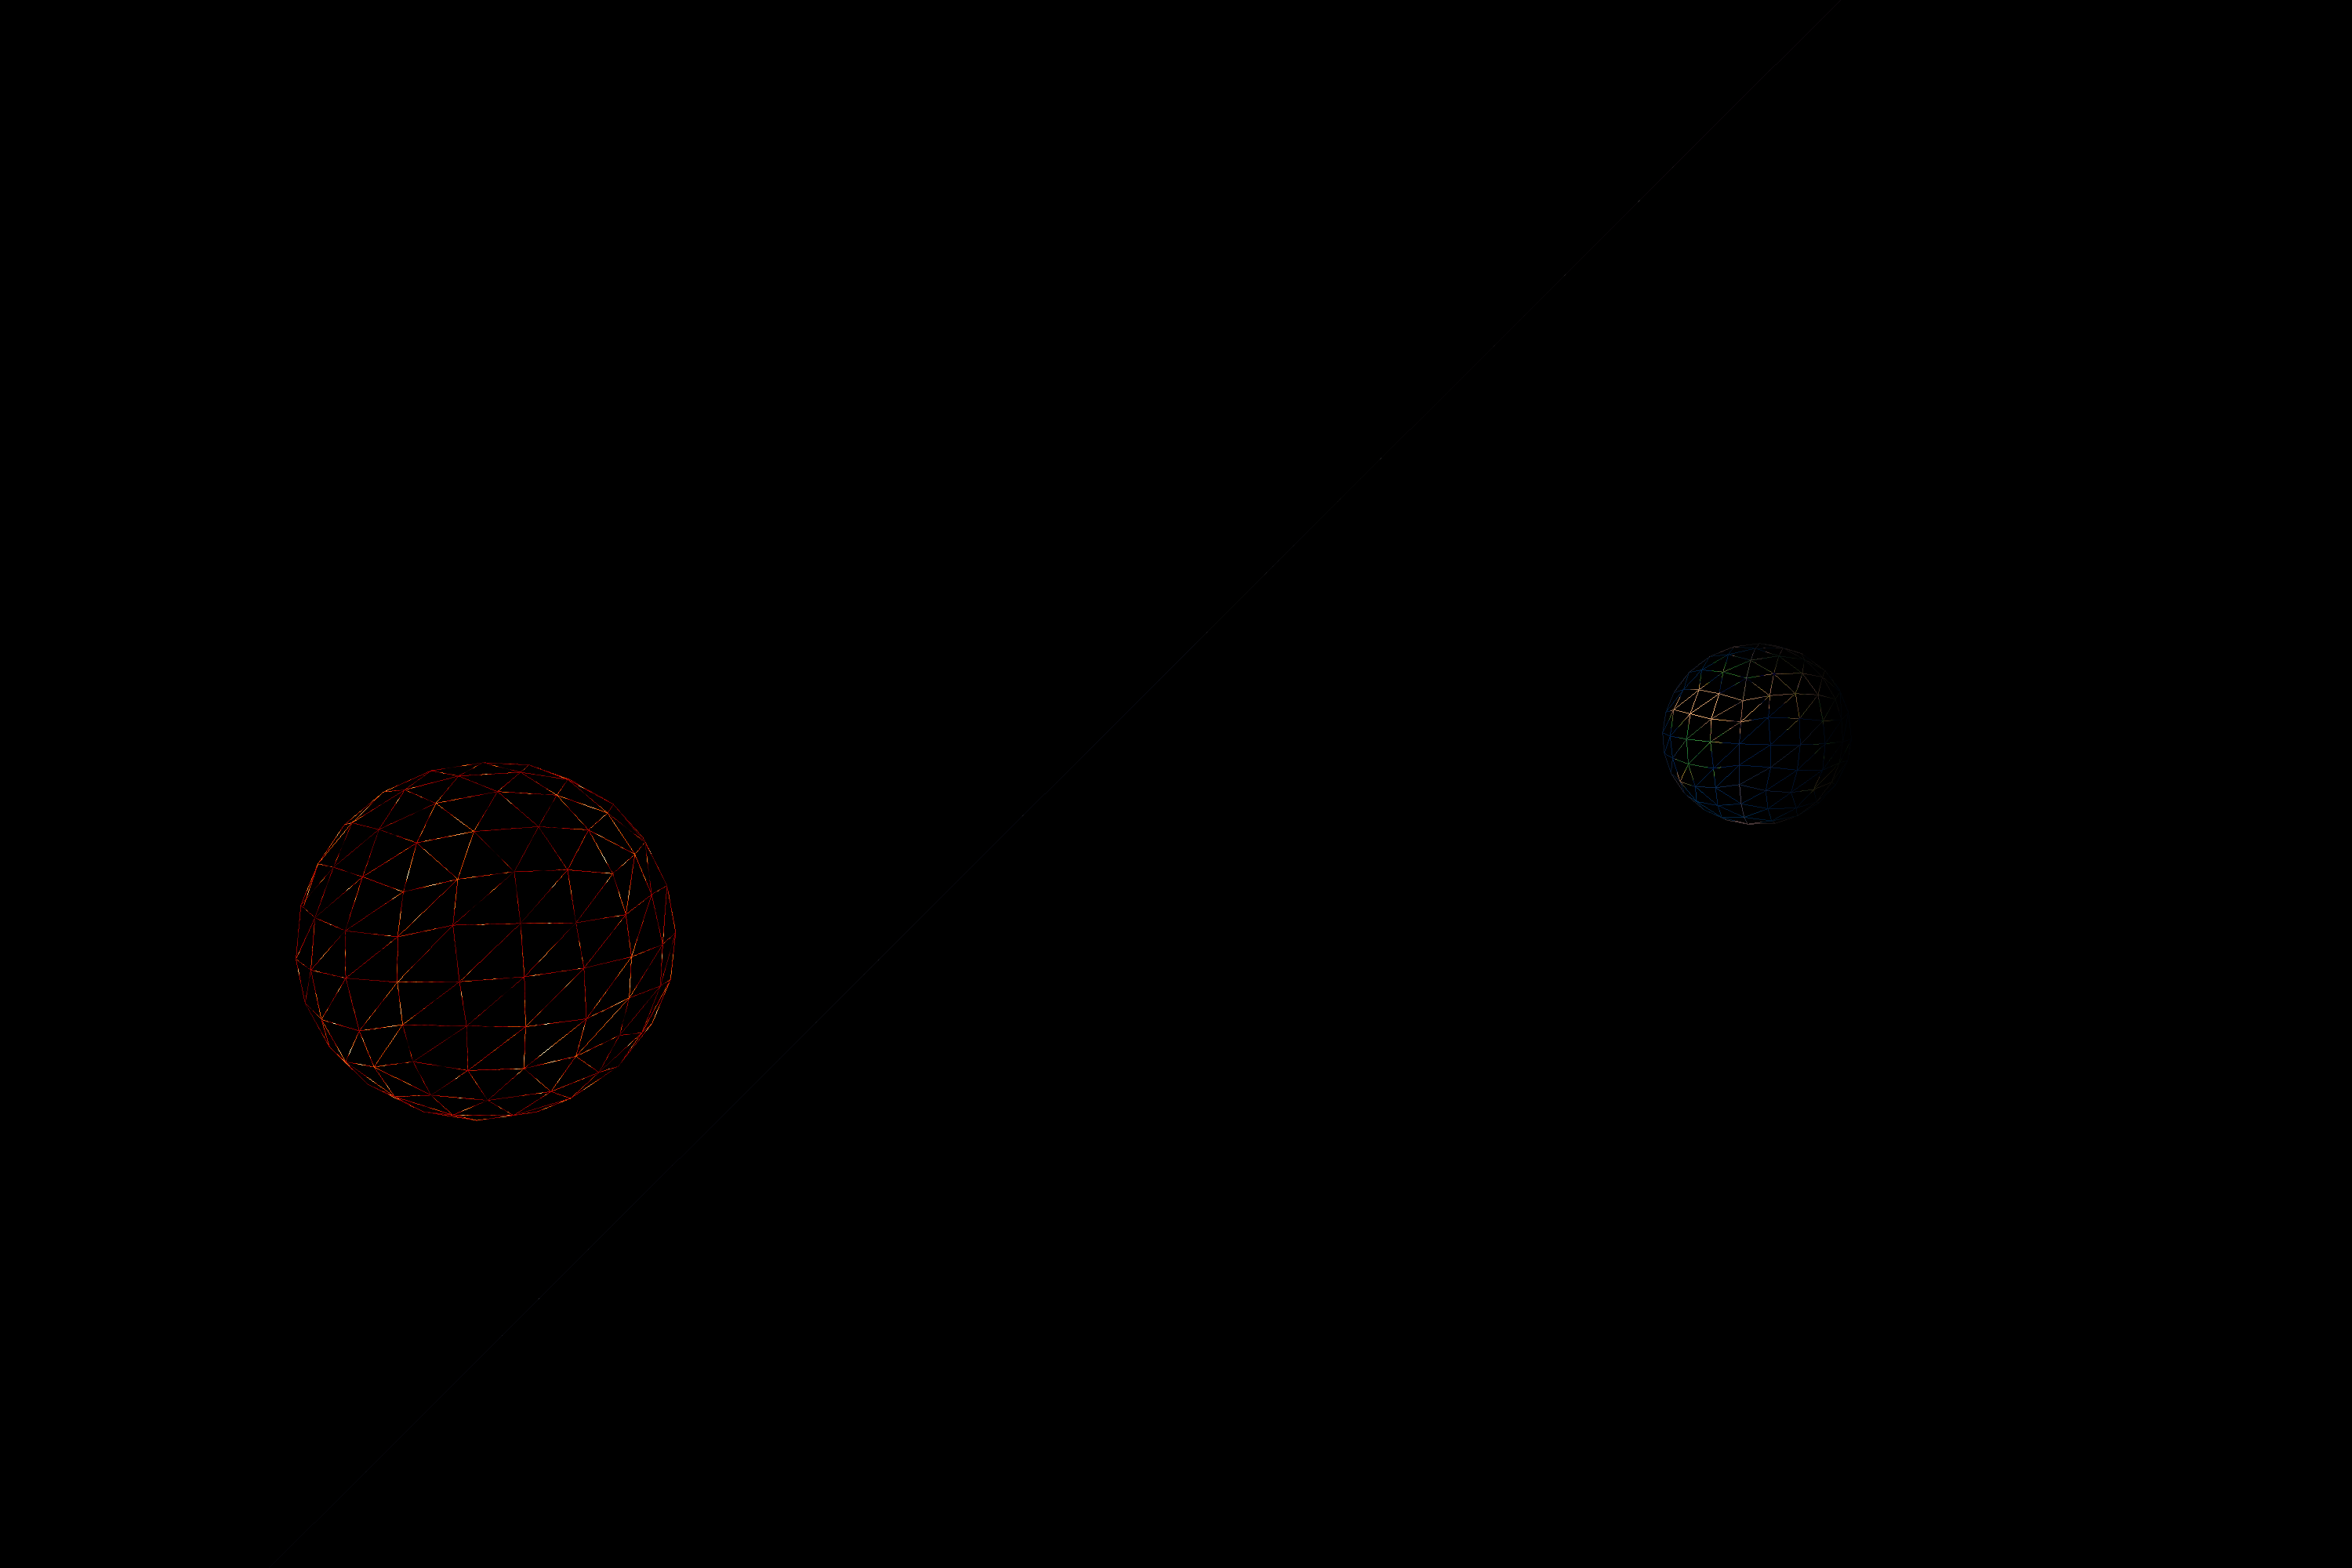
Space Simulation in OpenGL : Spring - Fall 2023
What is this Project?
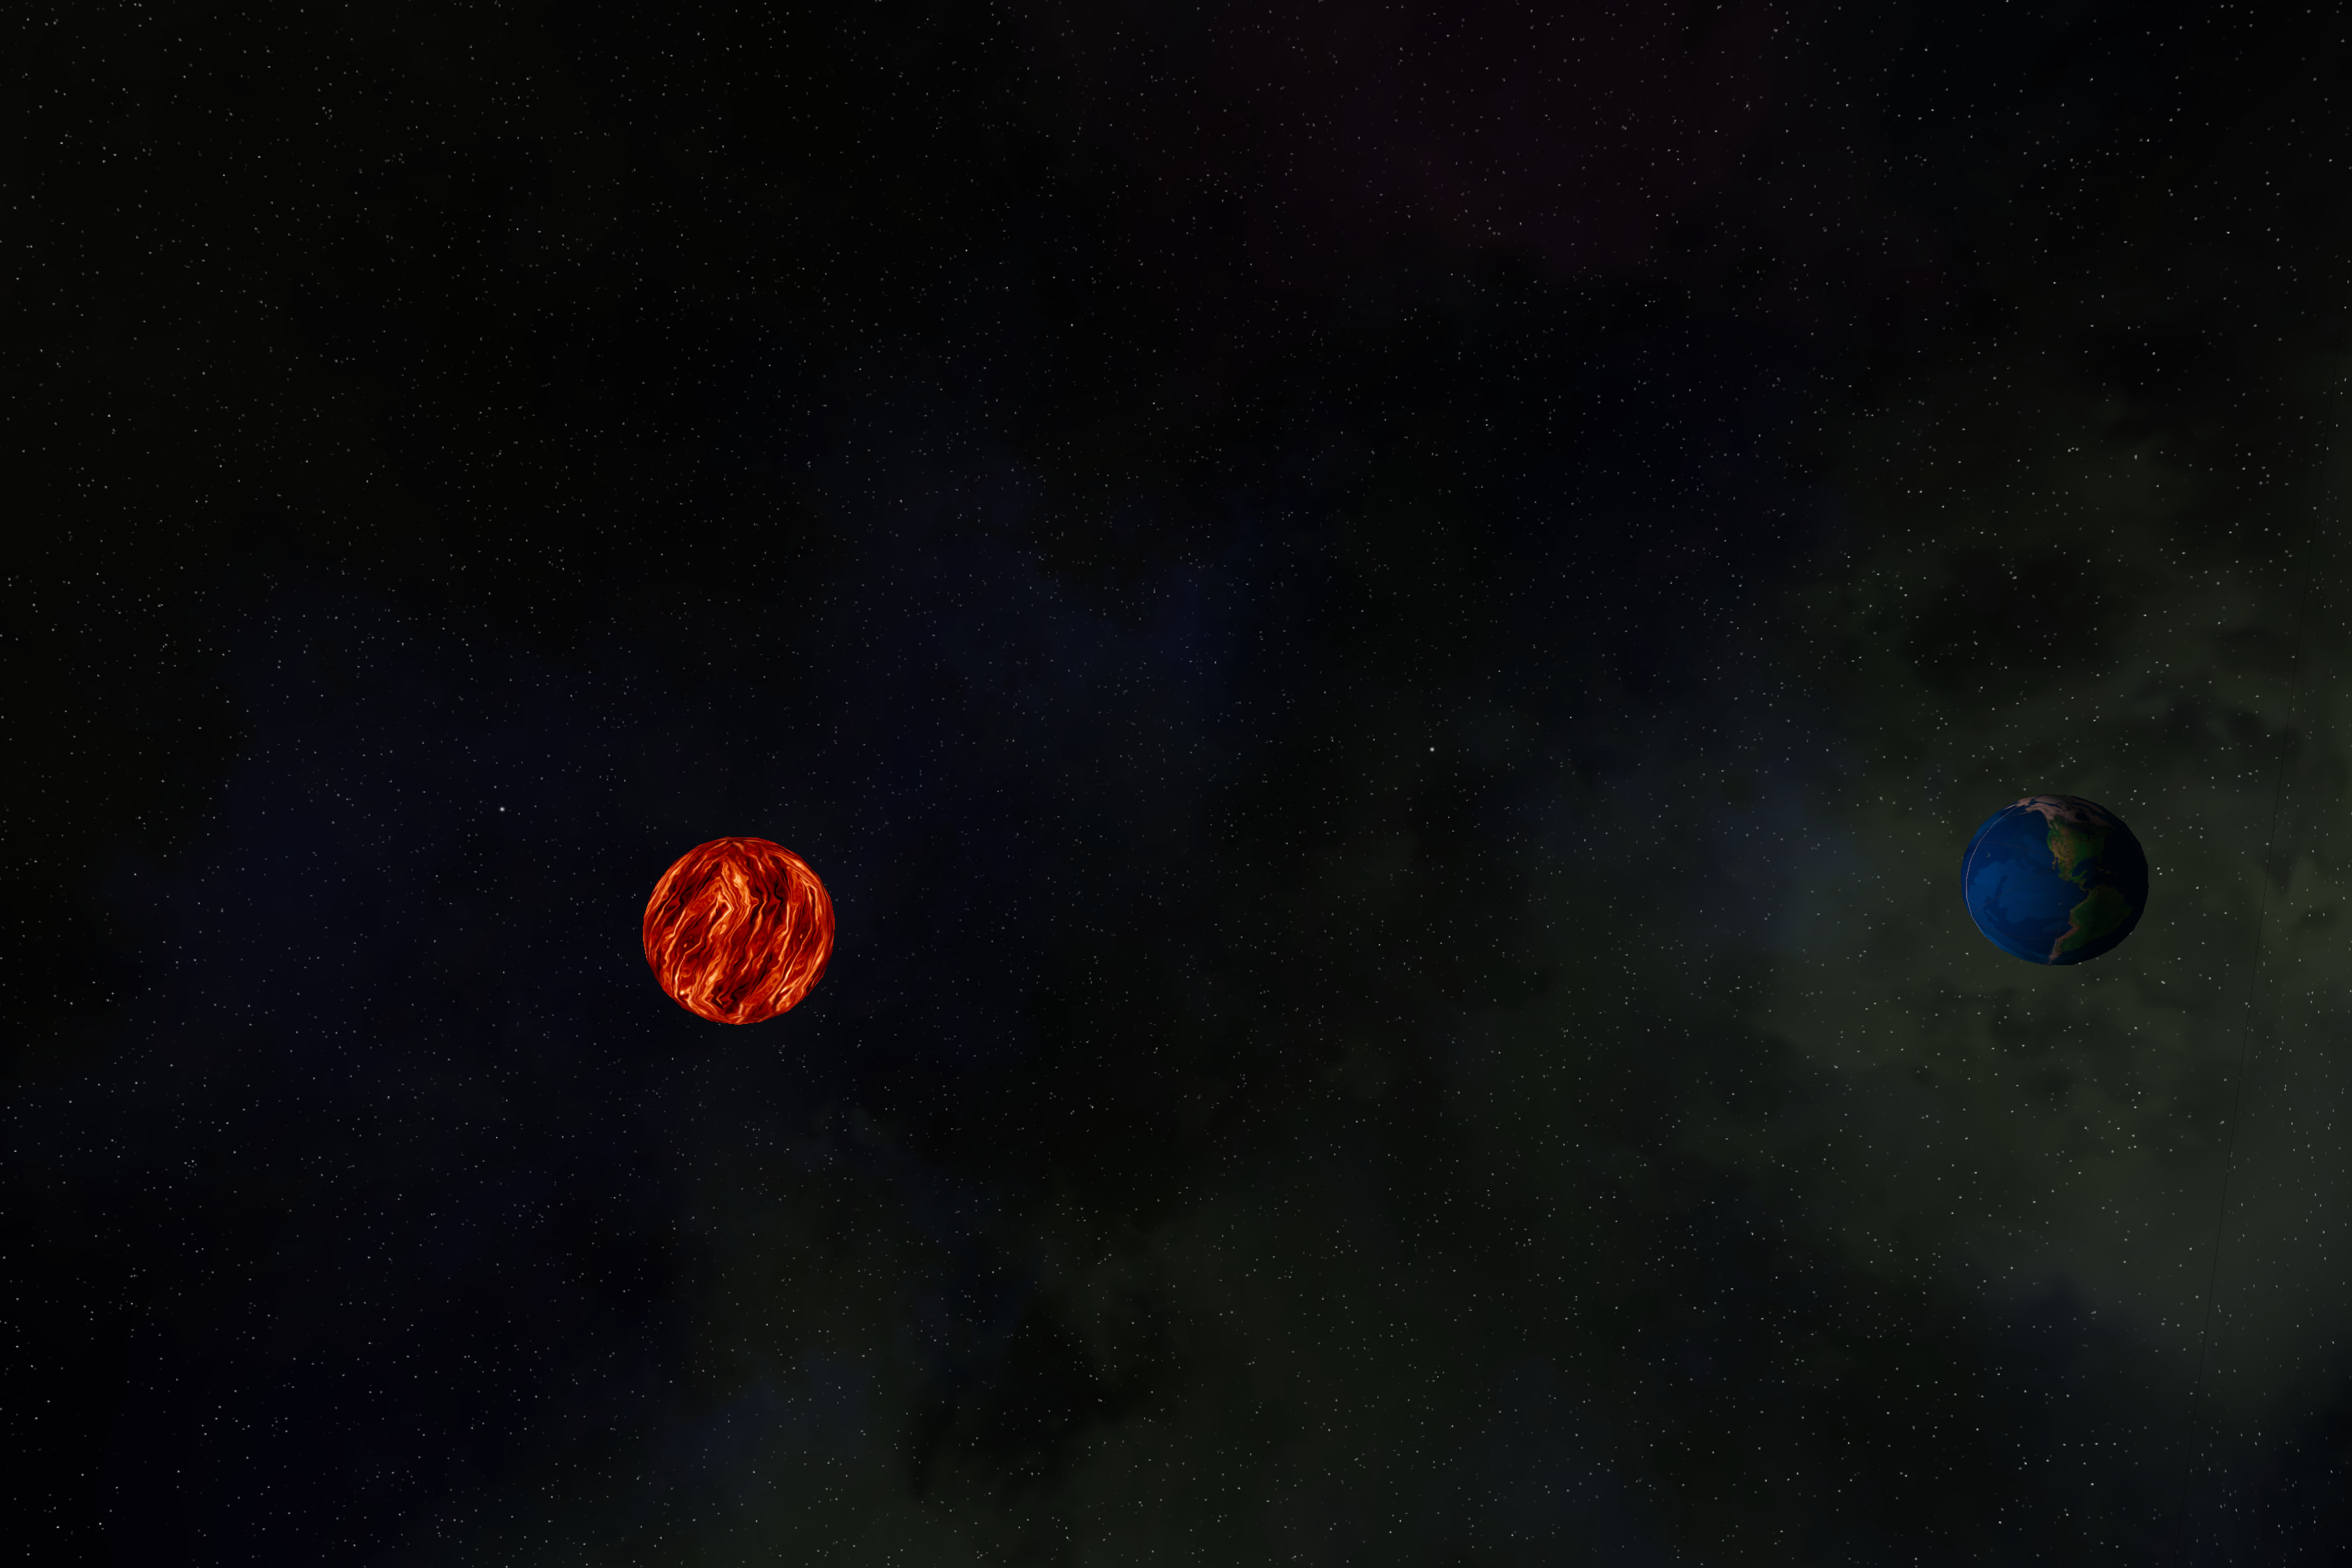
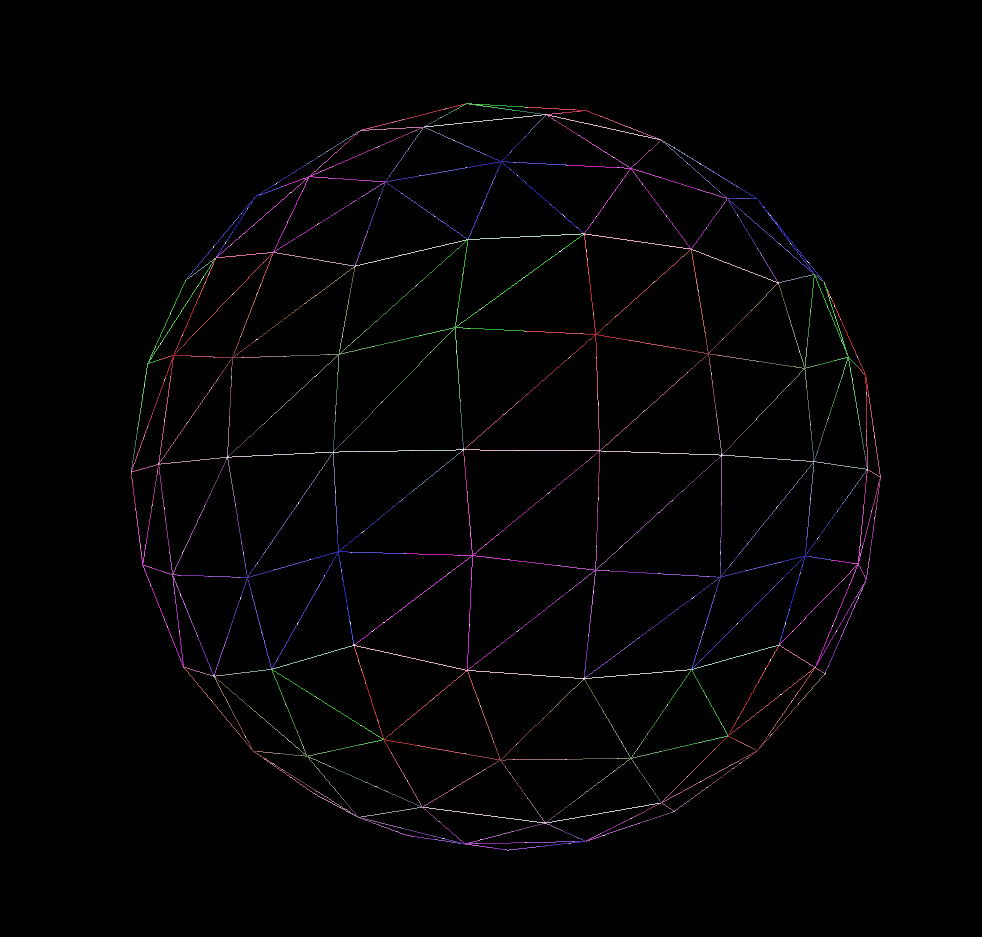
This project is a 3D space simulation, or to be more specific a gravity simulation, since I have not programmed in collisions yet, I plan to add this in the future, complete with customizable planets: which includes texture, size, mass, and spin. Built using OpenGL, GLFW, glm and for image processing: std_image.
How does it work?
I will try to keep this relatively short and just explain the foundation of OpenGL; however, it is quite complicated. It begins just like every other graphical framework with a blank screen (in OpenGL you need to create the blank screen but that’s unimportant) from here you can create shapes by using an array of coordinates: {x1,y1,z1,x2,y2,z2,x3,y3,z3}. However, these coordinates are pointless if you don't define the lines between them, so in a second array you can connect each point using their index in the array. Order matters due to face culling; this simply optimizes your code by only displaying the front faces / vertices rather than rendering all of them. Just like circuits, with face culling you can use the right-hand rule to determine the direction of the face. This also applies for 3D shapes because it is very important to pay attention to as there are more faces and dimensions to account for. Once we have all this information, we can store it in buffers, which essentially sets aside a chunk of memory in your computer for this data. Then using a vertex attribute pointer, you tell the computer how the data is stored: what data type it is, if there are any offsets, and what the stride of the data is. At this point we'd have enough to be able to draw a shape on the screen. This is a pretty watered-down explanation of the basics of OpenGL. The things I didn't explain about my project are screen-space projection, sphere generation, shape subdivision, texture unwrapping of various shapes, shading, cube mapping.
As for the physics involved in creating movement, this was my approach. For something to appear in motion its position needs to be updated every frame. So, to calculate where a planet would move in one frame, I first calculated delta time, then I iterated through each planet and calculated the summation force vector on the object from each of the other objects. To determine the amount of force from each object I had to use Newtons law of gravitation. However, having the force vector isn't enough, we still need to move the planet, so using Newtons second law, f/m=a (f=ma), I could determine the acceleration of the object. Multiplying that by delta time squared would give the change in position across that frame, then that simply gets added to the objects position from the last frame.
Recently I built my own GUI system for this project. It was my first time building my own GUI from scratch. This taught me a lot about what actually has to go into merely clicking a button as well as checking this for many different objects. Then we have to validate the input to ensure the program can understand it, once each of these steps are complete we can apply the given input to its respective output. This GUI allows the user to dynamically create planets after the simulation has started, rather than pre-defining and hard-coding each planet on run.
Future Plans?
- Optimizations: Currently runs great, could be optimized for large numbers of planets using instancing, and creating a max distance for calculating force
- Toggleable Tracers: lines that mark the path the planets took
- Increase Realism: Advanced textures (roughness, specular, displacement), clouds
- Collisions: allow planets to interact with each other
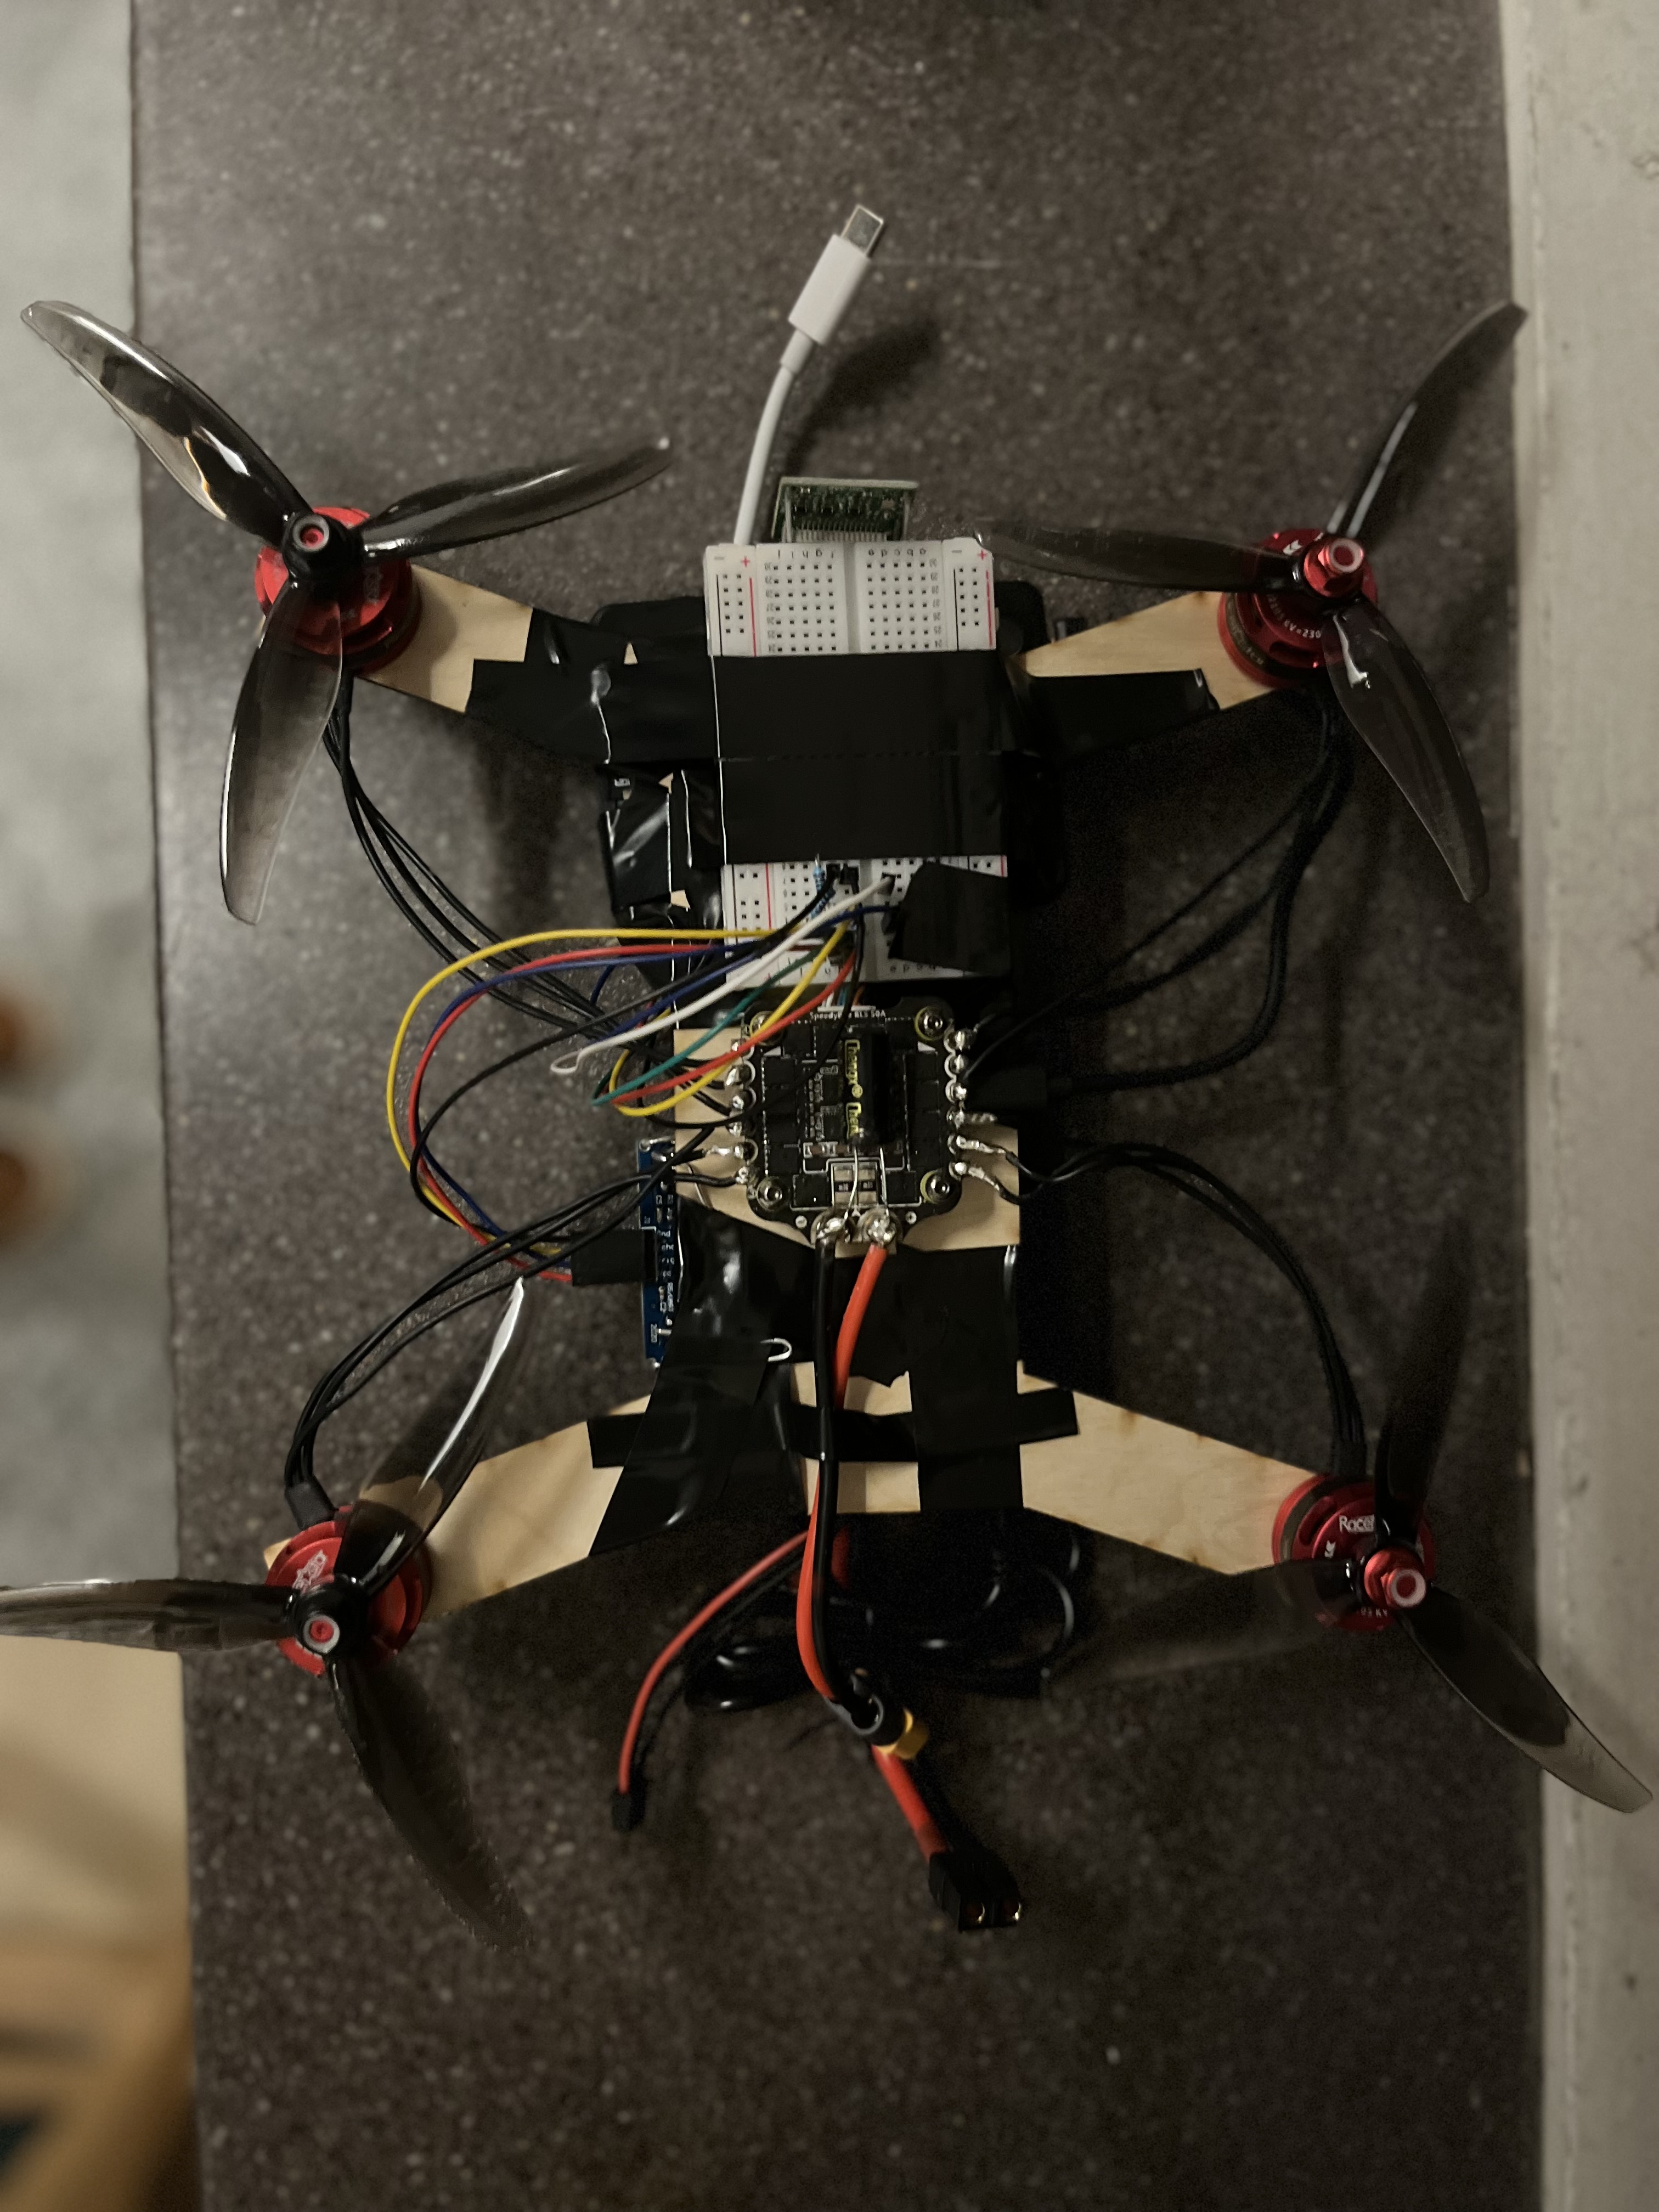
Raspberry Pi Drone : Spring 2023

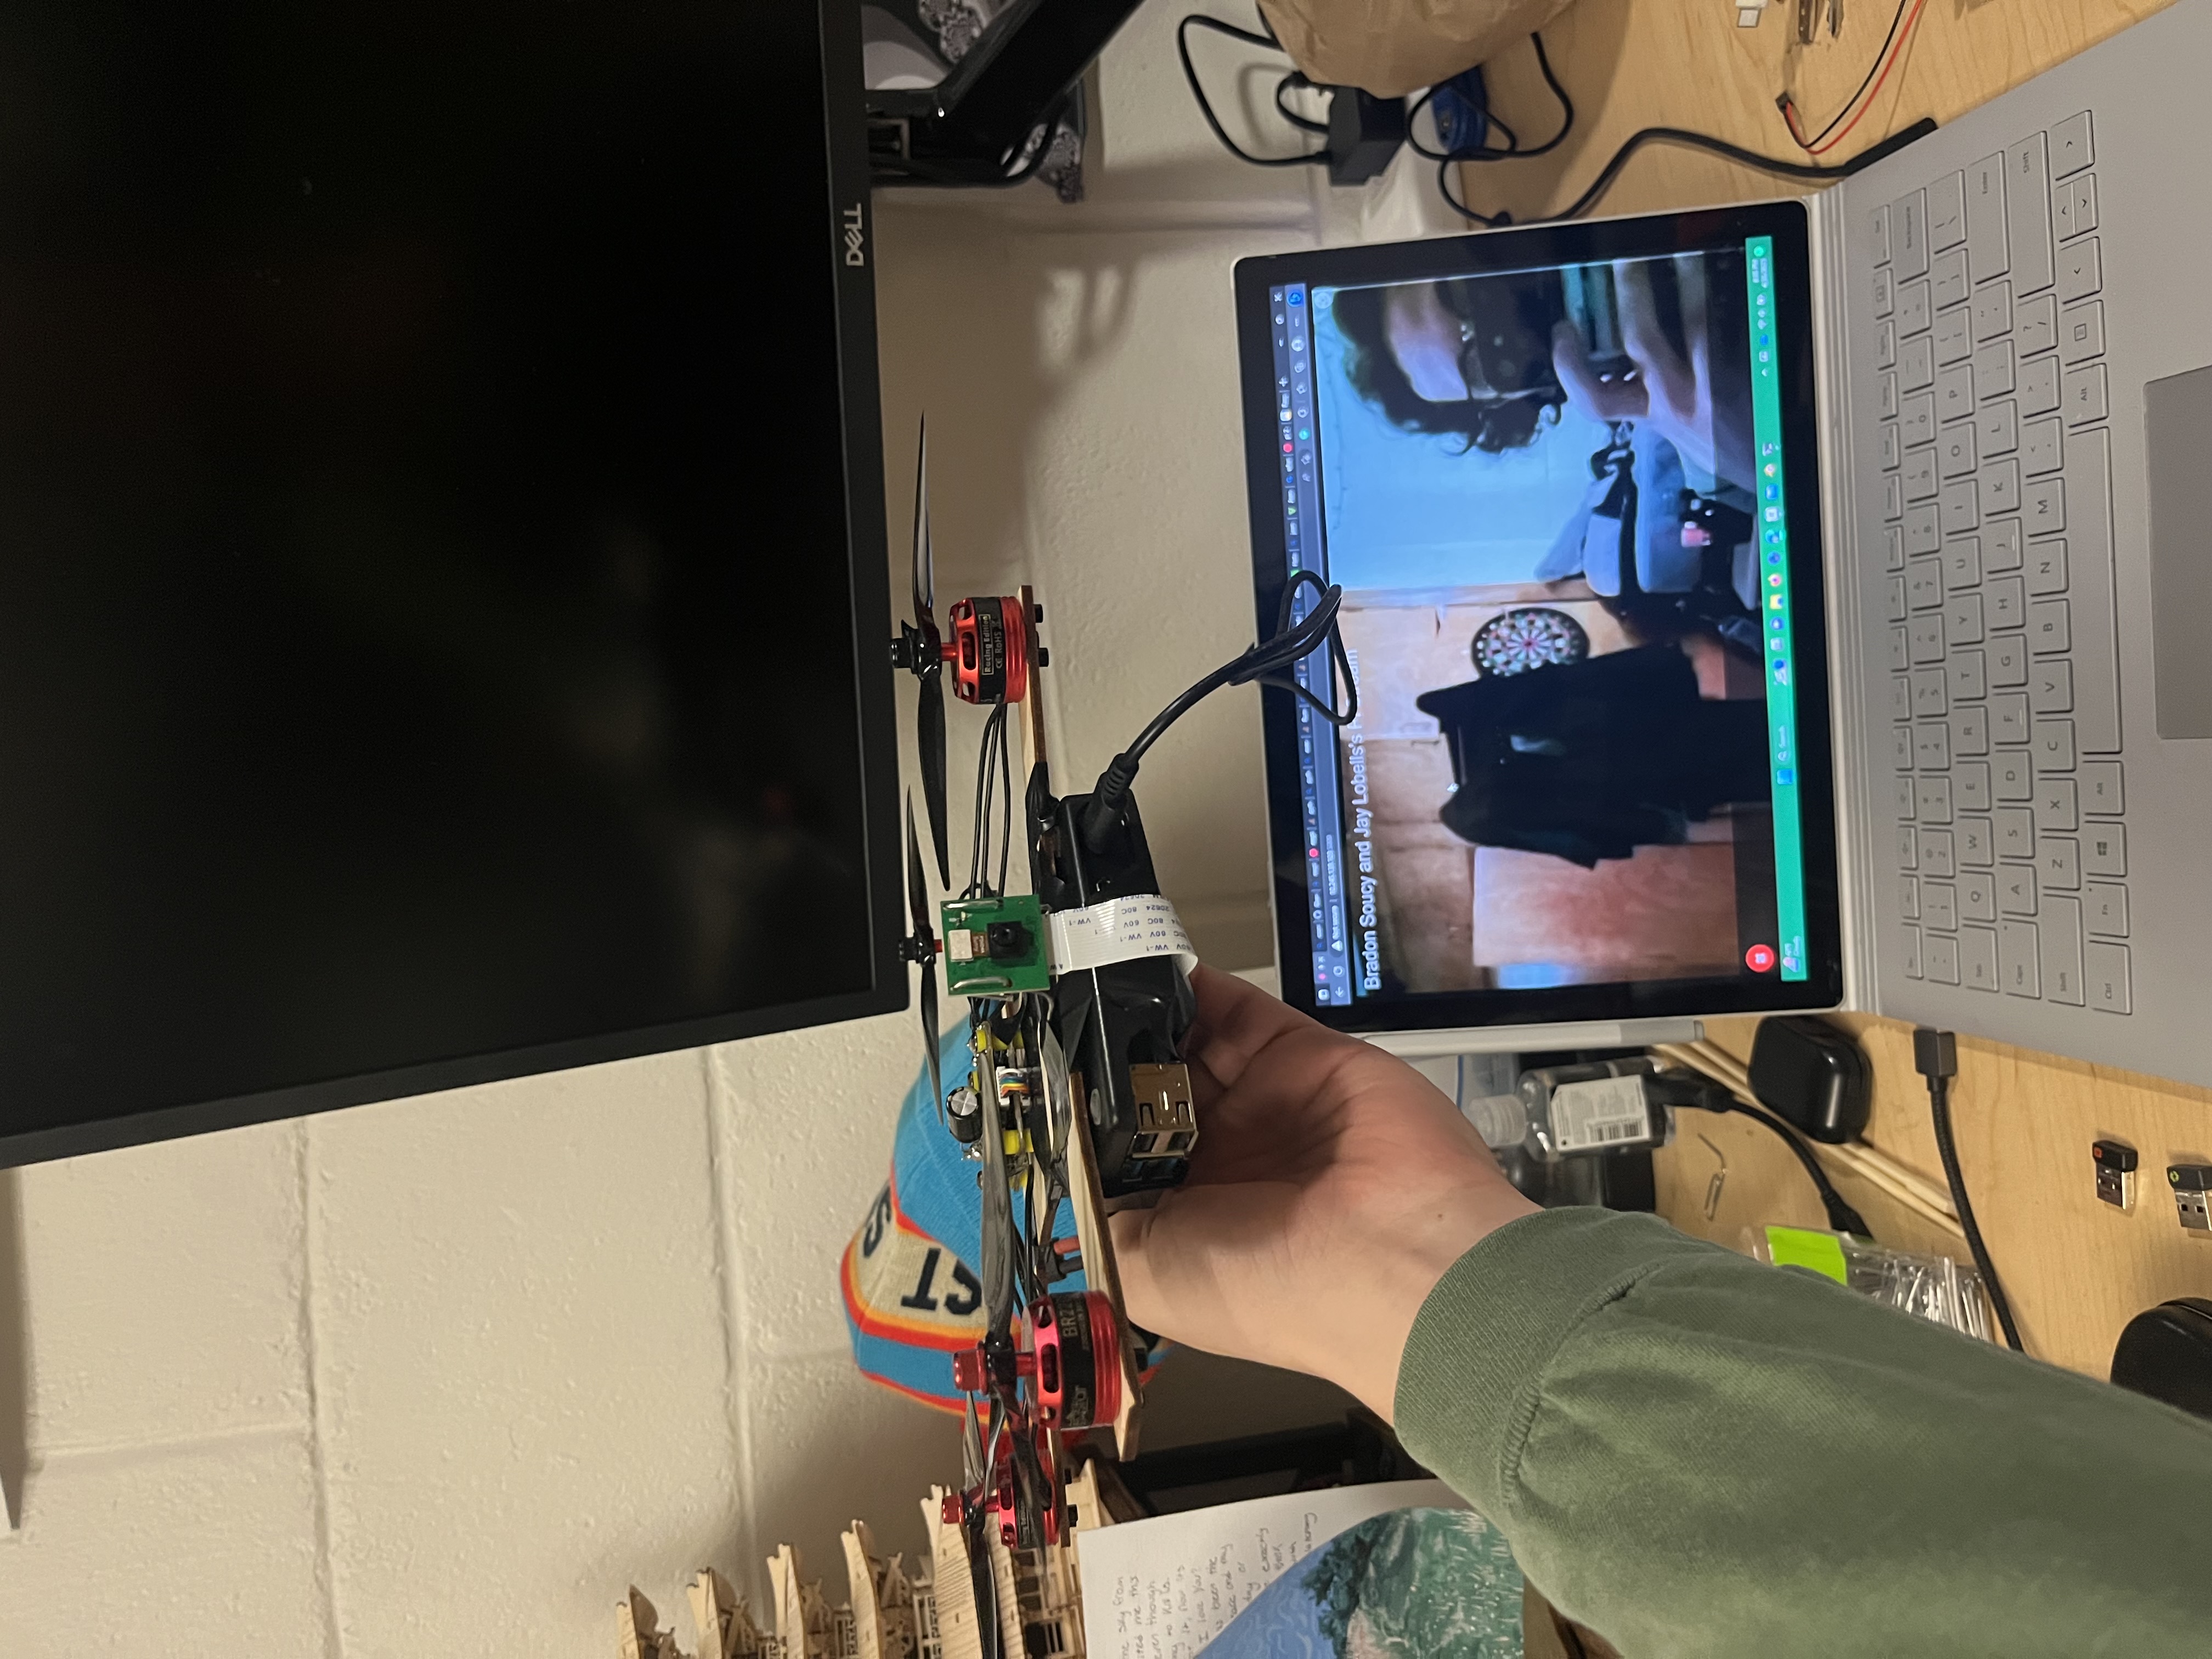

What is this project?
This project is for a class I took that taught about computer hardware and machine level operations while utilizing the Raspberry Pi. Throughout the semester you work on a project that uses the Raspberry Pi. I worked with a partner to make a drone.
What can it do?
Our Pi drone named "FlyPi" can control each motor uniquely using the Speedy FPV flight controller that can be controlled from your phone using an app. At the same time, the Raspberry Pi is taking a video using the Pi Camera as well as determining its altitude using a sonar ranging sensor. All this data is being streamed to a flask server giving us live data from the drone.
Future Plans
- Replace Motor: One of the motors was faulty and needs to be replaced
- Video Stream: look into video stream, it eventually freezes when it's running on battery power
Course Registration Bot : Spring 2023
What is this project?
This project had an interesting origin. I had heard of students making an auto course registration bot and using it to easily register for all their classes. Many of my friends were having difficulty registering for classes before they filled up. So, they asked me if I could make a bot. Initially, I didn’t think so, but by the end of the day I had a basic prototype..
What can it do? / How does it work?
The course registration bot is an automatic course enroller. You enter your login info, and the course numbers you want to enroll in, and it will automatically enter those into the website, the millisecond the course registration page loads. This bot allows you to register for all your classes before many people would even realize the course registration page even loaded.
As for how it works, it utilizes a python package called Selenium. Selenium is a library that can open its own chrome browser and within it you can search the web and retrieve HTML elements. Essentially whatever you can do with the web it allows you to do with python. After you enter your login info and course numbers in the terminal and run the python file, it goes to the UVM webpage and auto signs you in. Then it refreshes the page as fast as it can until the course registration page opens. Once this happens the bot finds the elements where you enter your courses, and automatically enters them all and hits submit.
Results and Future Plans
As for its primary function it works very well. I got into all my classes without issue, and my friend who a good portion of his classes had only a few spots left also got into them all without issue. If I were to add anything, Id maybe add a UI and if I really want to get fancy I could polish it up into an app.
Unity Multiplayer : Summer 2022
What Is This Project?
This project is an exploration of multiplayer utilizing Unity as a backbone. I was originally hoping to create a game from it, but instead I got a rough idea of what goes into a lot of the games we see today.
What Can It Do?
Unity multiplayer was an exploration of how real time multiplayer works. From the main menu you have a few options, either select to create or join a server. If you want to create, you can make either a private or public server. Or you can join a server, where you can enter a code to jion privately or join any available public server. Once loaded in, you can run around and jump in the simple start area.
Future Plans
- Improve Client Physics: Clients physics run different than the hosts
- Polish Into a Game: Continue building the world and make a cool multiplayer game
Homework Planner App : Fall 2021
What Is This Project?
This project was to develop for myself a good planner app. All the apps I had used in the past were set up poorly, in my opinion. I decided to create my own app using JavaFX. I later created a similar web version with better UI at Homework Planner Website
What Can It Do?
You can enter assignments using a UI that allows you to enter the title of the assignment, a description, the due date, how long you think it will take, and the importance. I created a seperate screen displaying the assignments you need to do where you could sort them by due date and urgency. I also created a recommended sort that combines the due date and how long it will take. This would sort ones that need to get worked on first towards the top.
Future Plans?
- Improve UI: the UI is good; however, it's not as intuitive and user friendly as I'd like
- Incorporate an Account System: save assignments to your account and then you can transfer assignments across devices
Website's HTML, CSS and JS Coded Entirely By Bradon Soucy